

Not only can building your own unique stand save money, but it also adds a personal touch to decorating your Christmas tree. With just a few simple materials and tools, creating an eye-catching stand is easy.
Tools Required
– Allen wrench
– Drill/driver
– Impact Drill
– Miter saw
Materials Required
2 8-ft 2×4’s
8 2-1/2-in. screws
8 8-in Wire Eye Lags
Take measurements of the tree and the bucket
To measure your Christmas tree’s base with the stand, you’ll need a sturdy and tall bucket that can support the weight of the tree. If you choose a small container, you may have to use rocks and bricks to stabilize the tree. This will require some experimentation to ensure stability. Take measurements of both the tree and the bucket to determine the right fit.

How to Build a Christmas Tree Stand
Build the Base
1. Cut one of your eight-foot 2x4s into four 23-1/2-inch lengths using a miter or circular saw.
2. Assemble those four sections of 2×4 into a square shape, butting the ends together in a spiraling pattern. This will result in a square base measuring 25-in x 25-in.
– Pro Tip: It’s recommended to use screws instead of nails when assembling the base to prevent it from coming apart later and causing the Christmas tree to topple over.

Determine How Big of an Opening You Need
To determine the size of the opening you need at the center, you can use a simple calculation.
First, measure the width of your base and subtract the size of the desired opening.
Then, divide that number by two and add the size of the opening. For example, if the base width is 25 inches and the desired opening size is 5 inches, the calculation would be ([25 – 5] / 2) + 5, which equals 15 inches.
This final number represents the length at which you should cut four more 2x4s to build the top of the stand.

Mark the Boards and Pre-Drill
– For each 2×4, make three marks.
– The first mark should be 5 inches away from the end of the board, which is the length of the opening.
– The second mark should be exactly halfway between the first mark, at 2-1/2 inches.
– The last mark should be at the length of the opening plus 3/4 inch, which is 5-3/4 inches.
Next, pre-drill some holes:
– Drill two clearance holes for 2-1/2-inch screws at the furthest mark, which is 5-3/4 inches. Partially drive screws into each of these holes.
– Pro Tip: Pre-drill two clearance holes for the wire eye lags that will hold your tree in place. Position them at the middle mark, which is 2-1/2 inches.

Assemble the Top of the Stand
Take those four 2x4s and assemble them in a pinwheel shape, aligning each edge with the five-inch mark made earlier. Make sure the pre-drilled holes are perfectly aligned. Then, finish driving the screws that were started earlier to secure the top of the stand.

Attach the Two Pieces Together
– Attach the two pieces of the tree stand together by placing the top on the base.
– Make sure everything is aligned and flush with the opening in the center of the base.
– Secure it in place by toenailing screws through the top and into the base.

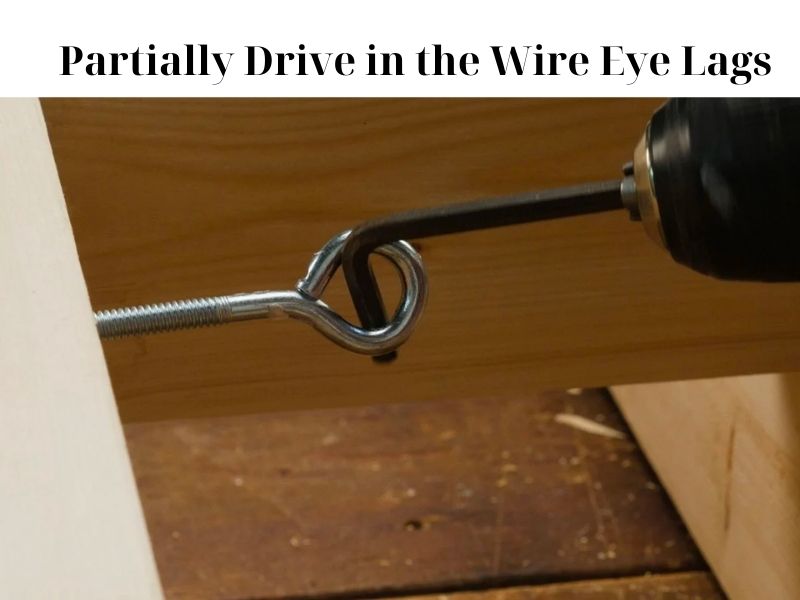
Partially Drive in the Wire Eye Lags
I’ll give you a pro tip for partially driving in the wire eye lags. Before putting the tree in position, start by driving the lag bolts into the pre-drilled holes you made earlier. This will make it easier to quickly drive them into the tree once it’s in place.
To drive the screw eye bolts easily, grab an Allen wrench and put it into the end of your drill/driver. Use that to gradually spin the bolt in.
Once you’ve completed this step, your new Christmas tree stand will be ready to go. Now it’s time for you to start looking for the perfect tree.
Decorate the bucket Christmas tree stand
If the tree is artificial, you can hide the base of the trunk by covering it with moss. For a real tree, wrap a Christmas tree skirt or a decorative cloth around the top of the bucket and secure it with a ribbon.
If you prefer to leave the pail uncovered, you can spray paint it to match your other holiday decor. Additionally, you can adorn the outside of the bucket with ribbons, tinsel, and bows to add some extra festive flair.

Add Christmas decorations to the tree
To add Christmas decorations to the tree, start by securing the tree inside a bucket. You don’t need a pricey tree stand – a simple bucket will do the trick. Make sure to stabilize the tree with rocks or bricks before decorating the bucket or adding a tree skirt.


Hi, my name is Phillip K. Weddle and I am the CEO of christmastreeblackfriday. I was born on May 18, 1966, and I currently reside at 2705 Bassel Street in Harahan, LA 70123. Being a Taurus, I am someone who is grounded, dependable, and enjoys the finer things in life. Before becoming the CEO, I worked as a Mold and Model maker at Robert Hall. However, my true passion lies in gardening, decoration, and DIY stuff, which is why I started this website. I wanted to bring together my love for the holidays and my enthusiasm for decoration and offer the best deals on Christmas trees at Black Friday.